This year for David’s birthday, he gave practically no ideas for what he wanted for his birthday, aside from a $600 tablet that wasn’t even available for sale. So I had to get creative. David takes a lot of really great photos, but hardly ever prints them out. We also don’t have a lot of wall space, so I thought it would be fun to make him a page a day calendar. Last year we had a great page a day calendar, but struggled to find one equally exciting for this year. When I initially had this idea, I thought it would be really simple — find the pictures, load them on shutterfly (or a similar program), and print. To my surprise, I couldn’t find a photo company who makes 365 day-calendars. For a while I abandoned the project. Then I started thinking about how easy it would be to make it myself. Here’s the result:
While I hope that shutterfly or some similar photo program eventually starts to do this. In case you wanted to do it at home yourself, here’s what I did.
1. Found pictures. I began at David’s birthday (June 15) and then went to the end of the year, so I only needed around 200 pictures. It was nice to have a few more pictures than I actually needed so that I didn’t get to the end of the year and have all my least favorite photos left.
2. Create a template. I used Microsoft Word. I created a box to the dimensions I wanted, then right-clicked on the box, chose ‘format shape’ then ‘fill’ then ‘picture or texture’ and then chose the picture I wanted. These directions are for a Mac, but its probably similar on another operating system. Here’s a sample photo to explain:
I then created a second box that was the same height, but only 1.25 inches wide that was a semi-transparent so the date would be clearly visibile.
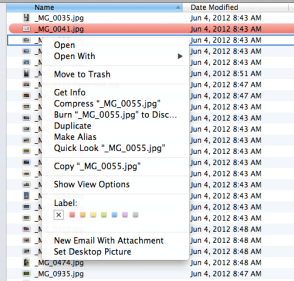
3. Insert photos. This was a long process. To help it along, as I used a picture I would then change the background color of it to help me remember what pictures I used. On a Mac that is done by right clicking on the file name and then going down to label and choosing a color. Here’s another image to explain:
I also created a different document for each month because the files get really large, which makes the program work more slowly. I also tried to match season with photo. This didn’t entirely work, but a snowy photo in August might have felt odd.
4. Print. Make sure to find a high quality color printer. Here’s one place I wish I had done something differently. I didn’t have time to try printing on different types of paper and wish I had used a slightly thicker paper. Cardstock would be too thick, but normal paper is a little thin.
5. Cut the calendar pages. I used the paper cutter from my department’s office. This was boring, but made better by watching Downton Abbey.
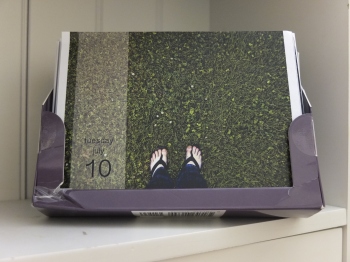
I used a leftover calendar stand from an old crafting calendar I had to display the calendar. Someone who is more resourceful or creative could probably find a way to make it stand on its own or perhaps bind it together. I think this can be done at Staples, but I’m not certain. Here’s the final product.
Anyway, I hope this is helpful.


